
Home Bookkeeping App Tutorial

Bookkeeping App Tutorial

Welcome to the Easy Expense App Tutorial Getting Started: To begin, please download the Easy Expense app from our website using the following link: Download Easy Expense App.…

  • 24/7 Phone Support
  • 24/7 WhatsApp Support
  • Email replies within 24–72 hours
LPA ACCOUNTANCY UK

Welcome to the Easy Expense App Tutorial

Getting Started:

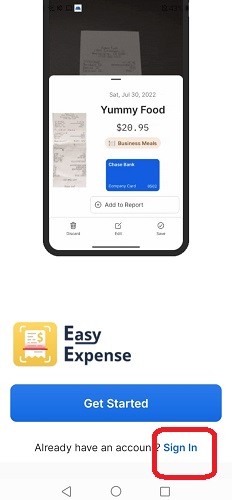
To begin, please download the Easy Expense app from our website using the following link: Download Easy Expense App. Once you have successfully installed the app on your device, follow the steps below to ensure effective use and accurate record-keeping:

Step by Step Guide

lpa accounatncy

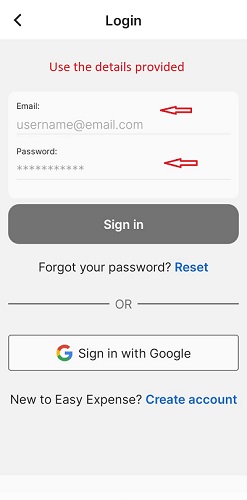
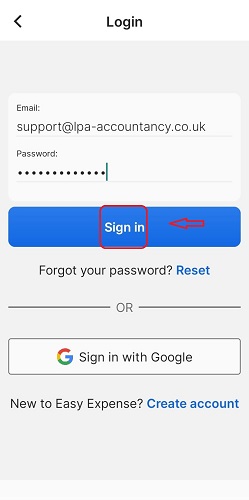
Login to the App

Before you begin using the Easy Expense app, you’ll need to log in using your credentials.

Password Recovery:
Contact LPA Accountancy at our contact form if you lost your password or login details.
Additional User Logins:
We understand the importance of collaboration, you can add additional user logins to support your team’s bookkeeping efforts at an additional charge.
lpa accounatncy

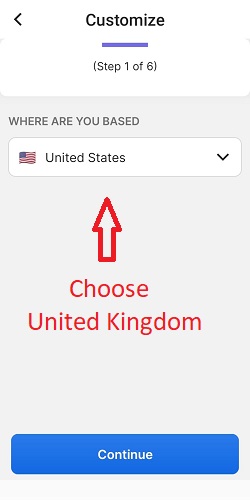
Setting Up Your Dashboard

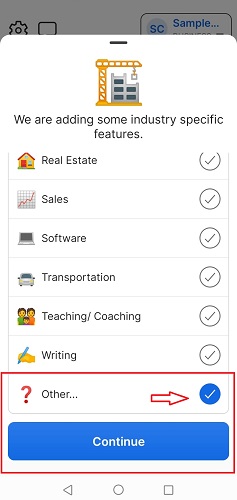
When you log in to the Easy Expense app for the first time, there are a few important settings you’ll need to configure to tailor your experience to your business. Let’s get started:

glasgow accountant
lpa accounatncy

Recording Expenses

Method 1: Using the Camera Icon

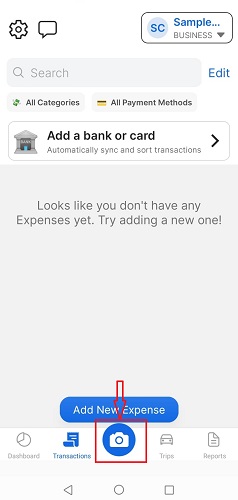
Recording your expenses with the Easy Expense app is simple. Here’s how to do it using the camera icon:

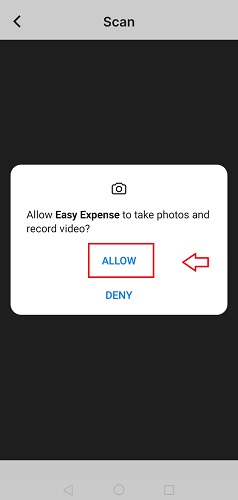
  1. Access the Camera Icon: Open the app and go to the expense recording section.
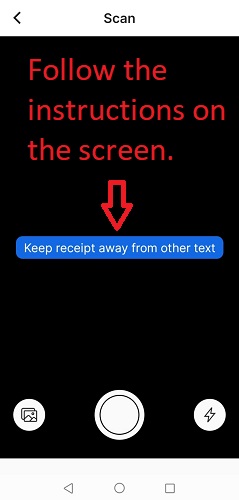
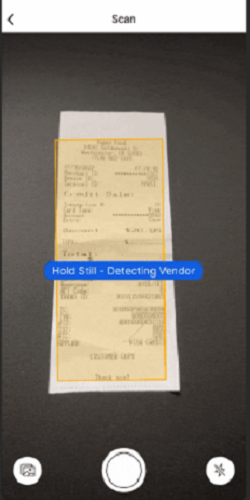
  2. Capture the Invoice: Tap the camera icon. Take a clear photo of the invoice or receipt.
  3. Automatic Information Extraction: The app will extract key details like date, vendor name, total amount, and VAT (if applicable).
  4. Verify the Details: Check if the app correctly read the information.
  5. Edit if Necessary: If needed, manually edit any details.
  6. Save: Confirm and save the entry.

Method 2: Manual Entry

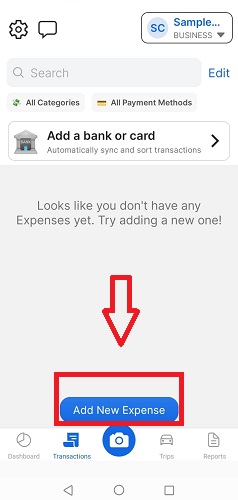
  1. Access the Manual Entry: Open the app and go to the expense recording section.
  2. Initiate a New Entry: Look for the “Add New Expense” button located above the camera icon. Tap on it.
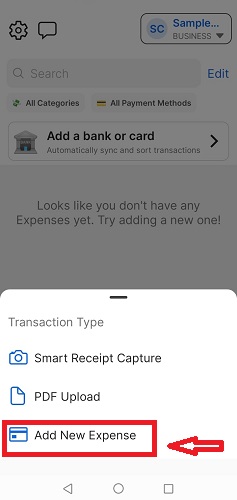
  3. Select “Add New Expense”: Choose the “Add New Expense” option from the list that appears.
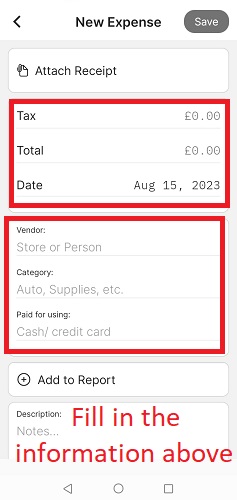
  4. Fill in the Details:
    • Tax (if applicable): Enter the tax amount associated with the expense.
    • Total Amount: Record the total amount spent or received.
    • Date: Input the date of the transaction.
    • Vendor: Enter the name of the vendor or business.
    • Category: Select the appropriate expense category from the provided list.
    • Payment Method: Choose whether the payment was made in cash or by card (optional).
    • Notes: Add any relevant notes or additional information (optional).
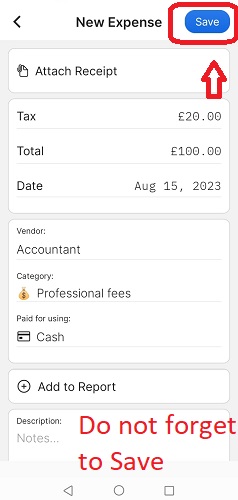
  5. Save: Once you’ve entered all the necessary details, save the entry.

Important Tip: Customize Your App for Better User Experience

Enhance your experience with the Easy Expense app by following these useful tips for customization:

Tip 1: Taking Clear Images

When capturing images of your receipts or invoices, clarity is key. Follow these steps for optimal results: 

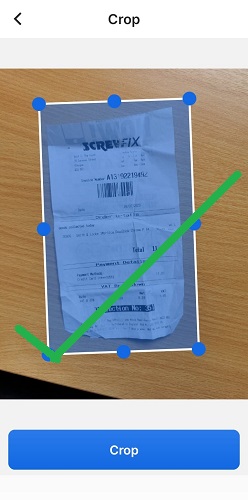
  • Image Coverage: Ensure the entire document is within the camera frame. All four corners should be visible in the photo.
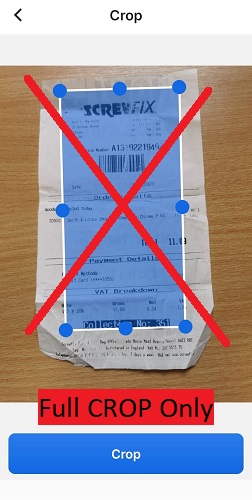
  • No Cut-Offs: When cropping the image, avoid cutting off any essential details. Make sure all text and data are fully visible.
  • Clarity: Capture a clear, well-lit image. Blurry or unclear photos may impact accurate information extraction.

Tip 2: Smart Cropping:

When cropping your receipt or invoice images, make sure to include all four corners and avoid cutting off any edges. This ensures that the entire document remains visible and no important information is lost.

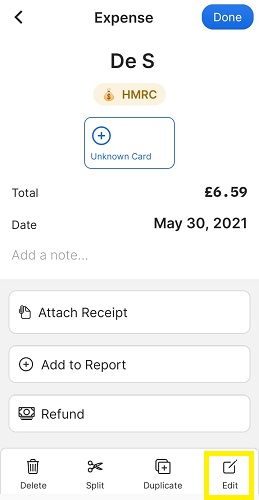
Tip 3: Editing of Transactions

Need to make changes to a transaction, invoice, or record? No problem. Follow these steps for smooth and hassle-free editing:

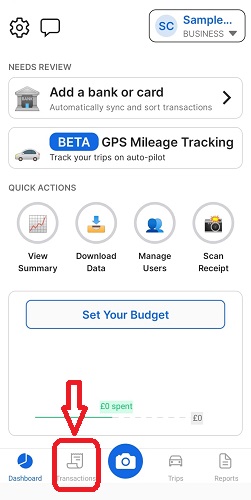
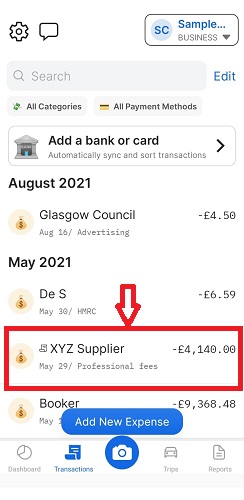
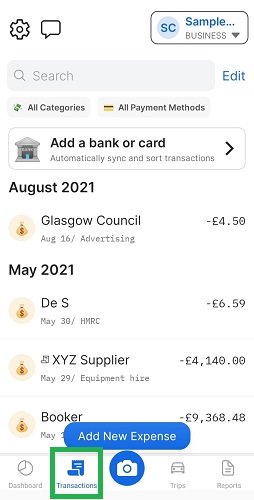
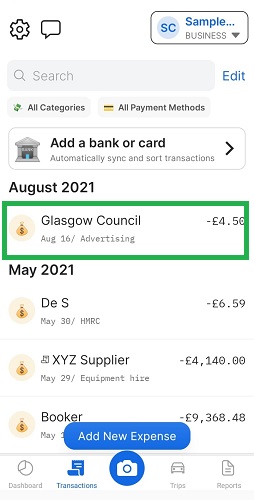
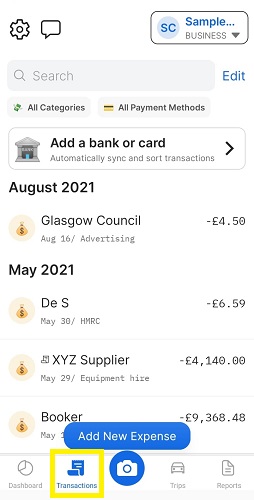
Step 1: Accessing Transactions:
  • From the main dashboard, navigate to the “Transactions” section.
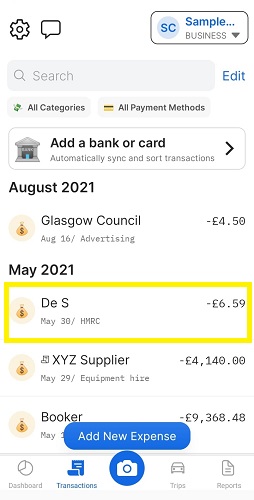
Step 2: Selecting the Transaction:
  • Find and choose the specific transaction that requires editing.
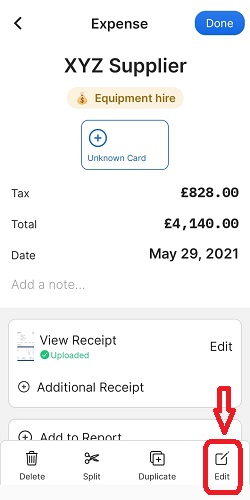
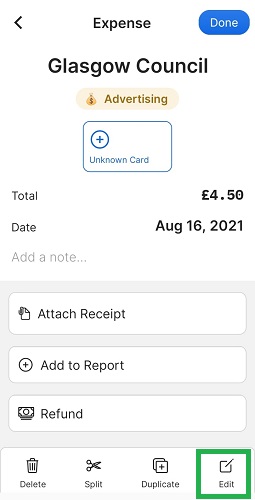
Step 3: Initiate Editing:
  • Look for the “Edit” option located at the bottom right corner of the page. Click on it.
Step 4: Make Your Changes:
  • Modify the necessary fields or details according to your edits.
Step 5: Save Your Changes:
  • After making the desired adjustments, save your changes to update the transaction.
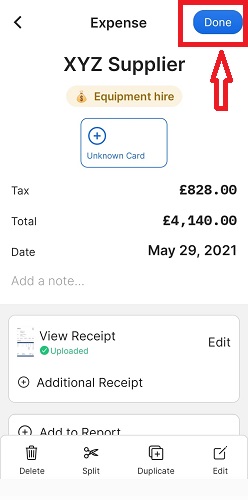
Step 6: Confirm and Complete:
  • Click “Done” to finalize the editing process.

Tip 4: Attaching Receipts to Expenses Manually

Attaching receipts to your expenses is a breeze with the Easy Expense app. Follow this simple guide to ensure accurate documentation:

Step 1: Accessing Transactions:
  • From the main dashboard, navigate to the “Transactions” section.
Step 2: Selecting the Transaction:
  • Find and choose the specific transaction that requires editing.
Step 3: Initiate Editing:
  • Look for the “Edit” option located at the bottom right corner of the page. Click on it.
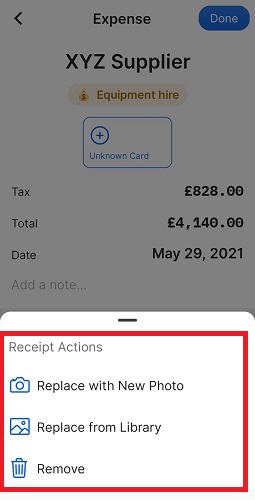
Step 4: Replace or Remove Receipt:
  • To replace or remove the existing receipt, look for the relevant option and follow the prompts.
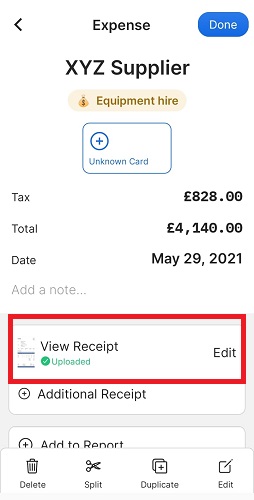
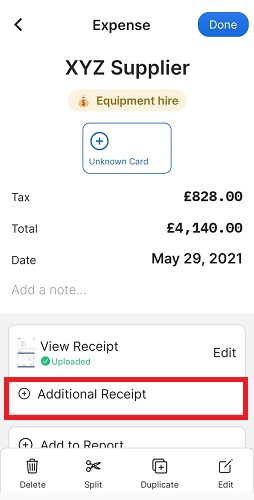
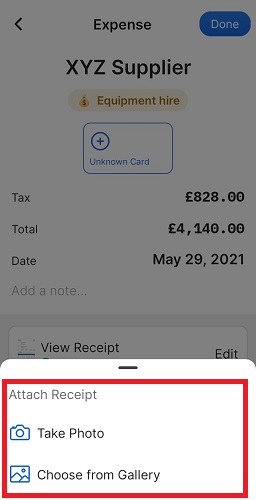
Step 5: Attach Additional Receipts:
  • For multiple receipts, click “Attach Additional Receipt” to add more images as needed.
Step 6: Save and Complete:
  • After attaching the receipt(s), save your changes and click “Done” to complete the process.
Step 7: Confirm and Complete:
  • Click “Done” to finalize the editing process.

Replace or Attach

Attach Additional Receipt

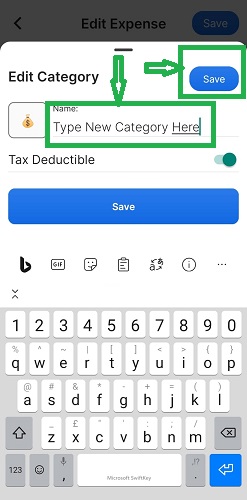
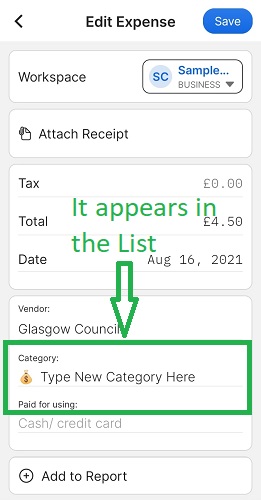
Tip 5: Creating New Categories for Better Organization

Customizing your expense categories in the Easy Expense app is a breeze. Follow these simple steps to ensure your expense categories align with your business needs:

Step 1: Accessing Transactions:
  • Begin by navigating to the “Transactions” section within the app.
Step 2: Selecting the Transaction:
  • Select any transaction.
Step 3: Initiate Editing:
  • Look for the “Edit” option located at the bottom right corner of the page. Click on it.
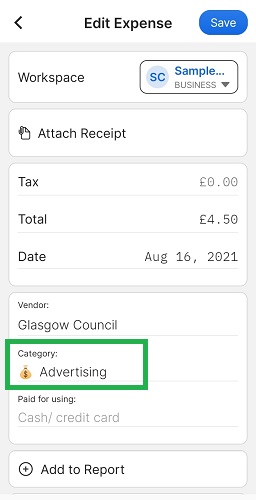
Step 4: Access Category Details:
  • Inside the editing interface, click on the “Category” field.
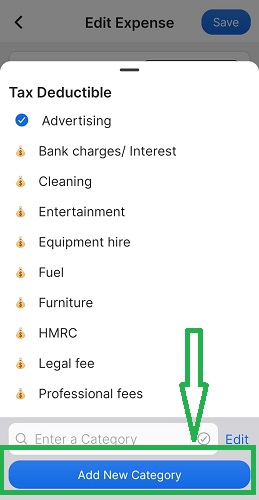
Step 5: Add New Category:
  • Click “Add New Category” to initiate the process.
Step 6: Save and Complete:
  • After entering the new category’s details, save your changes to update the transaction.
Step 7: Confirm and Complete:
  • Click “Done” to finalize the editing process.

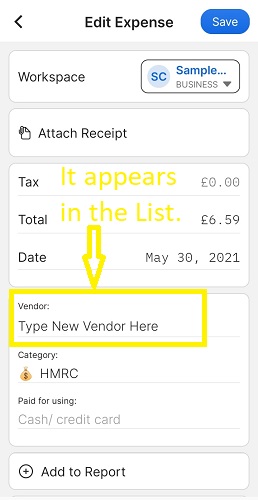
Tip 6: Adding a New Vendor Made Easy

Adding a new vendor to your records is a simple process in the Easy Expense app. Follow these straightforward steps to ensure your vendor list remains up-to-date:

Step 1: Accessing Transactions:
  • Begin by navigating to the “Transactions” section within the app.
Step 2: Selecting the Transaction:
  • Select any transaction.
Step 3: Initiate Editing:
  • Look for the “Edit” option located at the bottom right corner of the page. Click on it.
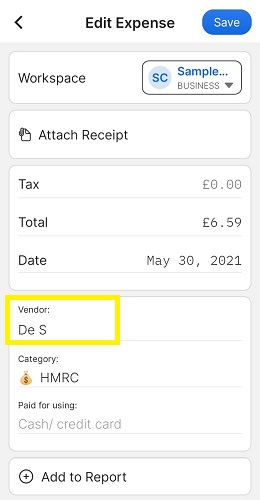
Step 4: Access Vendor Details:
  • Inside the editing interface, click on the “Vendor” field.
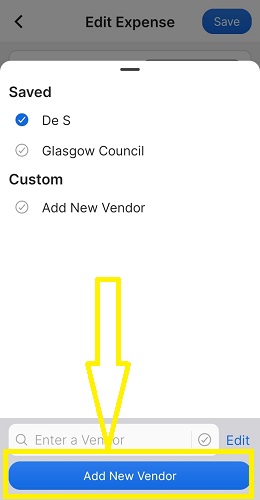
Step 5: Add New Vendor:
  • Click “Add New Vendor” to initiate the process.
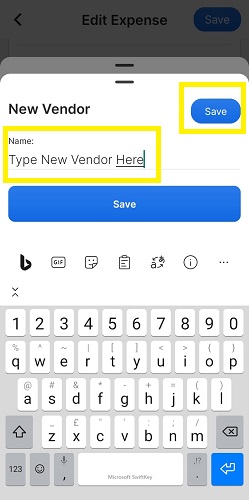
Step 6: Save and Complete:
  • After entering the new vendor’s details, save your changes to update the transaction.
Step 7: Confirm and Complete:
  • Click “Done” to finalize the editing process.

Tip 7: Adding Notes or Remarks to Transactions

Enhance the depth of your transaction records by including notes or remarks using the “Description” box within the Easy Expense app. Here’s how:

Step 1: Accessing Transactions:
  • From the main dashboard, navigate to the “Transactions” section.
Step 2: Selecting the Transaction:
  • Select the transaction you want to annotate and click “Edit” at the bottom of the transaction page.
Step 3: Initiate Editing:
  • Look for the “Edit” option located at the bottom right corner of the page. Click on it.
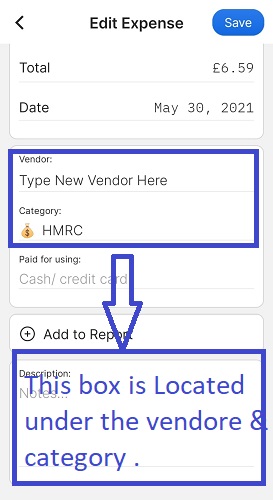
Step 4:Locate the “Description” Box:
  • While in edit mode, find the “Description” box positioned within the section dedicated to “Vendor” and “Category.”
Step 5: Add Notes or Remarks:
  • Enter any relevant notes, remarks, or additional information into the “Description” box.
Step 6: Save and Complete:
  • Once you’ve added your notes, save your changes to update the transaction.
Step 7: Confirm and Complete:
  • Click “Done” to finalize the editing process.

Bookkeeping

In this tutorial, we explored the key features of the app and guided you through the process of using the Easy Expense app. Proper bookkeeping is essential for maintaining accurate financial records and making informed decisions. By providing your financial information using the app, you can simplify your bookkeeping tasks and help us efficiently deliver our service


Download Bookkeeping App

Elevate your financial journey with LPA Accountancy. Partner with us to experience dedicated service and expertise that drives your financial excellence.
Download the Easy Expense app now and embark on your path to financial excellence with LPA Accountancy.

Talk to an accountant

We are based at 22 Milnpark St, Kinning Park, Glasgow G41 1BB and work with businesses across the UK. Phone and WhatsApp support are available around the clock, and email enquiries are answered within 24–72 hours.

Live Chat